
Rapidshare hack - Download unlimited files parallely
Many of my blog readers were asking me is there any way to download rapidshare files parallely
after a lot of research i found a method in which you can download any number of files parallely
Follow the given steps to download files simeltaniously

1. First download the rapidshare hack file from Here
2. Now save the rapidshare hack file as rapidshare hack .bat
(note :- You can save it as anyfilename.bat )
3. Now search for rapidshare premium link generators in google or use these rapid share
premium link generators given bellow
premium link generators given bellow
LIST of 4 Best Premium Link Generators:
4. Now you can download four files parallely after you finish the download Run rapidshare hack.bat every time before you download the next set of files by this methoid we can download any number files parallely , without any waiting time
FRIDAY, JUNE 11, 2010
How to lock folder in windows 7/vista
In my last post i told u how to lock a folder in xp folder lock
Tody iam going to teach u How to Lock/Password protect a Folder in Windows XP, Vista
We have a lot of sensitive data stored on our computer and it needs to be protected from illegal/unwanted access. There are many softwares available such as Folder Lock which are used to password protect a folder and help us to lock a folder in windows XP, Vista. Today in this article, I will inform you one of the simplest way on how to lock/password protect a folder in Windows XP or windows Vista
. I have provided link for software download
to lock a folder in windows xp and vista... just read on.
How to Password protect a folder:
Simply follow the guidelines given below to lock/password protect a folder in Windows XP, Vista.
1. Free Download
Bat File to lock/password protect afolder.
2. Now, copy "LockFolder.bat" to any desired folder where you want to store password protected files. Double click on "LockFolder.bat" and a new folder named "Locker" will be created.
3. Move all your files you want to hide in this newly created "Locker" folder.
4. Again double click on "LockFolder.bat" file and you will see a command prompt asking for confirmation. Hit "Y" to confirm that you want to lock/password protect the folder and hit enter.
How to Lock a Folder in Windows
5. The "Locker" folder will become invisible and thus, you are able to lock a folder in windows XP, Vista.
6. Now, when you want to unlock folder, again double click "LockFolder.bat" file and you will see command prompt asking for password to unlock folder. Enter "pass" (without quotes) as password and hit enter. You will again see the folder containing your private data and files.

Lock Folder in Windows Xp, Vista
That's it. So friends, I hope you are now well approached with this simple technique on how to lock/password protect a folder. If you have any problem in using this technique to password protect a folder in windows XP, Vista, please mention it in comments.
Enjoy the technique to password protect
a folder in windows XP, Vista...
Tody iam going to teach u How to Lock/Password protect a Folder in Windows XP, Vista
We have a lot of sensitive data stored on our computer and it needs to be protected from illegal/unwanted access. There are many softwares available such as Folder Lock which are used to password protect a folder and help us to lock a folder in windows XP, Vista. Today in this article, I will inform you one of the simplest way on how to lock/password protect a folder in Windows XP or windows Vista
. I have provided link for software download
to lock a folder in windows xp and vista... just read on.
How to Password protect a folder:
Simply follow the guidelines given below to lock/password protect a folder in Windows XP, Vista.
1. Free Download
Bat File to lock/password protect afolder.
2. Now, copy "LockFolder.bat" to any desired folder where you want to store password protected files. Double click on "LockFolder.bat" and a new folder named "Locker" will be created.
3. Move all your files you want to hide in this newly created "Locker" folder.
4. Again double click on "LockFolder.bat" file and you will see a command prompt asking for confirmation. Hit "Y" to confirm that you want to lock/password protect the folder and hit enter.
How to Lock a Folder in Windows
5. The "Locker" folder will become invisible and thus, you are able to lock a folder in windows XP, Vista.
6. Now, when you want to unlock folder, again double click "LockFolder.bat" file and you will see command prompt asking for password to unlock folder. Enter "pass" (without quotes) as password and hit enter. You will again see the folder containing your private data and files.
Lock Folder in Windows Xp, Vista
That's it. So friends, I hope you are now well approached with this simple technique on how to lock/password protect a folder. If you have any problem in using this technique to password protect a folder in windows XP, Vista, please mention it in comments.
Enjoy the technique to password protect
a folder in windows XP, Vista...
WEDNESDAY, DECEMBER 9, 2009
Hack administrator from Guest account.
In my last cmd post i told you how to lock a folder without any software
today i am going to tell how to Hack administrator from Guest account.
Ever wanted to hack your college pc with guest account/student account so that you can download with full speed Hack Administrator !!!!there ? or just wanted to hack your friend’s pc to make him gawk when you tell your success story of hacking ? well,there is a great way of hacking an administrator account from a guest account by which you can reset the administrator password and getting all the privilages an administrator enjoys on windows..Interested ? read on…
Concept:
Press shift key 5 times and the sticky key dialog shows up.This works even at the logon screen. But If we replace the sethc.exe which is responsible for the sticky key dialog,with cmd.exe, and then call sethc.exe by pressing shift key 5 times at logon screen,we will get a command prompt with administrator privilages because no user has logged on. From there we can hack the administrator password,even from a guest account.
Prerequisites
Guest account with write access to system 32.
Here is how to do that -
* Go to C:/windows/system32
* Copy cmd.exe and paste it on desktop
* rename cmd.exe to sethc.exe
* Copy the new sethc.exe to system 32,when windows asks for overwriting the file,then click yes.When asked to overwrite,overwrite the sethc.exe

* Now Log out from your guest account and at the user select window,press shift key 5 times.
* Instead of Sticky Key confirmation dialog,command prompt with full administrator privileges will open.

* Now type “ NET USER ADMINISTRATOR aaa” where “aaa” can be any password you like and press enter.
* You will see “ The Command completed successfully” and then exit the command prompt and login into administrator with your new password.
* Congrats You have hacked admin from guest account.
Further..
Also, you can further create a new user at the command prompt by typing “NET USER john/ADD” where “john” is the username you would like to add with administrator privileges. Then hide your newly created admin account by -
Go to registry editor and navigate to this key
[HKEY_LOCAL_MACHINE\SOFTWARE\Microsoft\Windows NT\CurrentVersion\Winlogon\SpecialAccounts\UserList]
Here create a new DWORD value, write its name as the “user name” that u created for your admin account and live with your admin account forever :)
I hope that was informative..
today i am going to tell how to Hack administrator from Guest account.
Ever wanted to hack your college pc with guest account/student account so that you can download with full speed Hack Administrator !!!!there ? or just wanted to hack your friend’s pc to make him gawk when you tell your success story of hacking ? well,there is a great way of hacking an administrator account from a guest account by which you can reset the administrator password and getting all the privilages an administrator enjoys on windows..Interested ? read on…
Concept:
Press shift key 5 times and the sticky key dialog shows up.This works even at the logon screen. But If we replace the sethc.exe which is responsible for the sticky key dialog,with cmd.exe, and then call sethc.exe by pressing shift key 5 times at logon screen,we will get a command prompt with administrator privilages because no user has logged on. From there we can hack the administrator password,even from a guest account.
Prerequisites
Guest account with write access to system 32.
Here is how to do that -
* Go to C:/windows/system32
* Copy cmd.exe and paste it on desktop
* rename cmd.exe to sethc.exe
* Copy the new sethc.exe to system 32,when windows asks for overwriting the file,then click yes.When asked to overwrite,overwrite the sethc.exe
* Now Log out from your guest account and at the user select window,press shift key 5 times.
* Instead of Sticky Key confirmation dialog,command prompt with full administrator privileges will open.
* Now type “ NET USER ADMINISTRATOR aaa” where “aaa” can be any password you like and press enter.
* You will see “ The Command completed successfully” and then exit the command prompt and login into administrator with your new password.
* Congrats You have hacked admin from guest account.
Further..
Also, you can further create a new user at the command prompt by typing “NET USER john/ADD” where “john” is the username you would like to add with administrator privileges. Then hide your newly created admin account by -
Go to registry editor and navigate to this key
[HKEY_LOCAL_MACHINE\SOFTWARE\Microsoft\Windows NT\CurrentVersion\Winlogon\SpecialAccounts\UserList]
Here create a new DWORD value, write its name as the “user name” that u created for your admin account and live with your admin account forever :)
I hope that was informative..
FRIDAY, NOVEMBER 13, 2009
FOLDER LOCK -NO SOFTWARE
Want to hide your ‘really’ private data ? but reluctant to use professional SOFTWARE
Here is how to do that -
Create a new folder,rename it to a simple name like xero.
Now go to its properties,and choose a sprite less icon,which is next to a Yellow lock icon in third row. Choose it,click OK and now folder will have no icon,literally invisible.Now to make it almost inaccessible,we must use some Batch renaming technique.
Create a new text file in the same drive next to the folder and type thiscommand statement into it-

Now save this text file as lock.bat. Similarly create another text file and type this command statement into it-
What we have done here,is that we have renamed the folder with a random CLSID,which will change its identity into something else sing DOS. ‘CLSID’ is a unique registry-identifying component that is used to identify anActiveX control or in simple language,it identifies which file/control will be opened by which program in Windows. I have determined the CLSID by opening registry editor and searching for “CLSID” and choosing any random value like {b5946137-7b9f-4925-af80-51abd60b20d5}which I m using here.
Some common CLSID’s are -
But still,it has a name. So,in order to completely hide it, Rename it and enter an ASCII code by pressing ALT+0160 which will enter a null character in place of name and it will have No Name.

Congrats..Now you have created an inaccessible folder. To access it,just rename the folder into its original name and then click on key.bat . Now make sure to place the folder in a secure location and place lock.bat and key.bat in different locations . This simple folder lock is very effective as no one has idea that You can create it (sarcasm..again :P) .
Use some creativity and you can make that folder 100% inaccessible by encrypting it. I gave you a hint,find your own way :)
Here is how to do that -
Create a new folder,rename it to a simple name like xero.
Now go to its properties,and choose a sprite less icon,which is next to a Yellow lock icon in third row.
Choose it,click OK and now folder will have no icon,literally invisible.Now to make it almost inaccessible,we must use some Batch renaming technique.Create a new text file in the same drive next to the folder and type thiscommand statement into it-
ren xero xero.{b5946137-7b9f-4925-af80-51abd60b20d5}
Now save this text file as lock.bat. Similarly create another text file and type this command statement into it-
ren xero.{b5946137-7b9f-4925-af80-51abd60b20d5} xeroSave this text file as lock.bat . Lock.bat will be used to make the folder inaccessible and Key.bat will be used to revert it into its original form.

What we have done here,is that we have renamed the folder with a random CLSID,which will change its identity into something else sing DOS. ‘CLSID’ is a unique registry-identifying component that is used to identify anActiveX control or in simple language,it identifies which file/control will be opened by which program in Windows. I have determined the CLSID by opening registry editor and searching for “CLSID” and choosing any random value like {b5946137-7b9f-4925-af80-51abd60b20d5}which I m using here.
Some common CLSID’s are -
- Recycle bin - 645FF040-5081-101B-9F08-00AA002F954E
- Control panel - 21EC2020-3AEA-1069-A2DD-08002B30309D
- Run - 2559A1F3-21D7-11D4-BDAF-00C04F60B9F0
- Search - 2559A1F0-21D7-11D4-BDAF-00C04F60B9F0
- Connect To - 7007ACC7-3202-11D1-AAD2-00805FC1270E
- Briefcase - 85BBD920-42A0-1069-A2E4-08002B30309D
- Help - 2559A1F1-21D7-11D4-BDAF-00C04F60B9F0
- Fonts - D20EA4E1-3957-11d2-A40B-0C5020524152
- Cameras and Scanners - E211B736-43FD-11D1-9EFB-0000F8757FCD
- My Network places - 208D2C60-3AEA-1069-A2D7-08002B30309D
But still,it has a name. So,in order to completely hide it, Rename it and enter an ASCII code by pressing ALT+0160 which will enter a null character in place of name and it will have No Name.
Congrats..Now you have created an inaccessible folder. To access it,just rename the folder into its original name and then click on key.bat . Now make sure to place the folder in a secure location and place lock.bat and key.bat in different locations . This simple folder lock is very effective as no one has idea that You can create it (sarcasm..again :P) .
Use some creativity and you can make that folder 100% inaccessible by encrypting it. I gave you a hint,find your own way :)
TUESDAY, NOVEMBER 3, 2009
Send Fake Email – Fake Email Pranks

Most of the email forging tutorials on internet will teach us how to send fake email connecting to SMTP server of the ISP or any other domain. But this is not possible since these hacks will no longer work today because SMTP of remote server will reject any attempts for unauthorised access. Also many of the websites offer you to send fake email from their sites where none of them work. So we have to run our own SMTP server on our computer to successfully send a fake email. SMTP server is a simple software program which can be installed on your computer in few seconds. SMTP server allows you to send fake email right from your desktop easily and effectively. Download QK SMTP server HERE. This is the SMTP server i am using in my tutorial. Once you download and install the server on your comp then you are all set to send fake email successfully.
PART A: CONFIGURING SMTP SERVER
Once you have installed the QK SMTP server on your comp you must perform the following configuration.
1. Click on “Settings” button on the main screen,the Settings window pops up
2. On Settings window click on “Basic Parameter” tab
3. Set binding IP to “127.0.0.1″
4. Set port to “25″
PART B: SENDING FAKE EMAIL (EMAIL FORGING)
1. Click on SMTP server icon on your desktop to start your SMTP server to run(The icon is shown on the notification area of the taskbar if it is running). If it is already running then this step can be ignored
2. Goto command prompt(Start-Accessories-Command prompt)
3. Type exactly as follows
C:>telnet 127.0.0.1 25
Here 127.0.0.1 is the default IP of every computer.25 is the port number. SO you are connecting to the SMTP server running on your own computer.This step is very importand to send fake email.
NOTE: The IP 127.0.0.1 should not be substituted by any other IP.
Heres the snapshot of what you see after step 3. Click on it to enlarge
4. After typing the telnet command in the command prompt you get entry to the server which displays the following message. The response of a OK SMTP server is given below. Message within Green color is only explanation.
220 Welcome to QK SMTP Server 3
helo hacker (Type helo & any name followed by space)
250 Hello hacker (Server Welcomes You)
mail from:billg@microsoft.com (email ID can be anything of your choice. This is the ID from which fake email appears to have come from) 250 billg@microsoft.com Address Okay (Server gives a positive response) rcpt to:admin@gmail.com (Type any valid recipient email address) 250 admin@gmail.com Address Okay (Server gives a positive response) data (type this command to start input data) 354 Please start mail input
From:Gates <billg@microsoft.com>
To:admin@gmail.com
Date:Sat Jan 5,2008 9:45 PM
Subject:Test to send fake email
You can create as many headers followed by the “:” symbol.
NOTE:HEADERS SHOULD NOT CONTAIN A LINE GAP. IF SO IT IS CONSIDERED AS BODY OF THE EMAIL. Press enter twice so that there is a line gap between the header & body data
250 Mail queued for delivery (Sever indicates that the email is ready for sending) quit (Type this command to quit from server) 221 Closing connection. Good bye.
Connection to host lost
(You will get the above 2 lines of message after typing “quit” command)
(Your fake email is sent to the recipient)
*****END OF EMAIL FORGING*****
Here’s the screenshot for your convenience
NOTE: THE ABOVE METHOD HAS A VERY LOW SUCCESS RATE. FOR A COMPLETELY WORKING METHOD PLEASE REFER MY NEW POST - How to Send Anonymous Emails – A New Working Way
MONDAY, NOVEMBER 2, 2009
Netbios Hacking
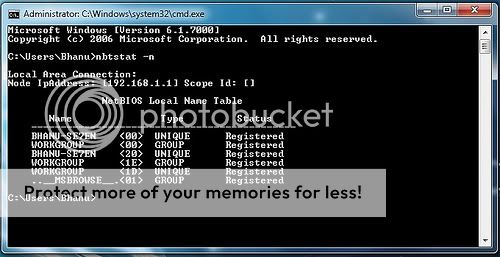
THIS NETBIOS HACKING GUIDE WILL TELL YOU ABOUT HACKING REMOTE COMPUTER AND GAINING ACCESS TO IT’S HARD-DISK OR PRINTER.NETBIOS HACK IS THE EASIEST WAY TO BREAK INTO A REMOTE COMPUTER.
STEP-BY-STEP NETBIOS HACKING PROCEDURE1.Open command prompt
2. In the command prompt use the “net view” command
( OR YOU CAN ALSO USE “NB Scanner” OPTION IN “IP-TOOLS” SOFTWARE BY ENTERING RANGE OF IP ADDRESSS.BY THIS METHOD YOU CAN SCAN NUMBER OF COMPUTERS AT A TIME).
Example: C:\>net view \\219.64.55.112
The above is an example for operation using command prompt.”net view” is one of the netbios command to view the shared resources of the remote computer.Here “219.64.55.112″ is an IP address of remote computer that is to be hacked through Netbios.You have to substitute a vlaid IP address in it’s place.If succeeded a list of HARD-DISK DRIVES & PRINTERS are shown.If not an error message is displayed. So repeat the procedure 2 with a different IP address.
3. After succeeding, use the “net use” command in the command prompt.The “net use” is another netbios command which makes it possible to hack remote drives or printers.
Example-1:
C:\>net use D: \\219.64.55.112\F
Example-2:
C:\>net use G: \\219.64.55.112\SharedDocs
Example-3:
C:\>net use I: \\219.64.55.112\Myprint
NOTE: In Examples 1,2 & 3, D:,G: & I: are the Network Drive Names that are to be created on your computer to access remote computer’s hard-disk.
NOTE: GIVE DRIVE NAMES THAT ARE NOT USED BY ANY OTHER DRIVES INCLUDING HARD-DISK DRIVES,FLOPPY DRIVES AND ROM-DRIVES ON YOUR COMPUTER.THAT IS IF YOU HAVE C: & D: AS HARD DIRVES, A: AS FLOPPY DIVE AND E: AS CD-DRIVE, GIVE F: AS YOUR SHARED DRIVE IN THE COMMAND PROMPT
F:,”SharedDocs” are the names of remote computer’s hard-disk’s drives that you want to hack. “Myprint” is the name of remote computer’s printer.These are displayed after giving “net use” command. “219.64.55.112″ is the IP address of remote computer that you want to hack.
4. After succeeding your computer will give a message that “The command completed successfully“. Once you get the above message you are only one step away from hacking the computer.
Now open “My Computer” you will see a new “Hard-Disk drive”(Shared) with the specified name.You can open it and access remote computer’s Hard-Drive.You can copy files,music,folders etc. from victim’s hard-drive.You can delete/modify data on victim’s hard-drive only if WRITE-ACCESS is enabled on victim’s system.You can access files\folders quickly through “Command Prompt”.
NOTE: If Remote Computer’s Firewall Is Enabled Your Computer Will Not Succeed In Gaining Access To Remote Computer Through Netbios.That is Netbios Hacking Is Not Possible In This Situation.(An Error Message Is Displayed).So Repeat The Procedure 2,3 With Different IP Address.
HAPPY NETBOS HACKING!!
Windows XP IP Utilities

The following are the IP utilities available in Windows that help in finding out the information about IP Hosts and domains.These are the basic IP Hacking Commands that everyone must know!
NOTE: The term Host used in this article can also be assumed as aWebsite for simple understanding purpose.
1. PING
PING is a simple application (command) used to determine whether a host is online and available.PING command sends one or more ICMP Echo messages to a specified host requesting a reply.The receiver (Target Host) responds to this ICMP Echo message and returns it back to the sender.This confirms that the Host is online and available.Otherwise the host is said to be unavailable.
Syntax:
C:>ping gohacking.com
Syntax:
C:>ping gohacking.com
2. TELNETTelnet command is used to connect to a desired host on a specified port number.For example
Syntax:
C:>telnet yahoo.com 25
C:>telnet yahoo.com
NOTE: The default port number is 23.When the port number is not specified the default number is assumed.
Telnet Hacking is explained in detail in the following post.
How To Send Fake Email
Syntax:
C:>telnet yahoo.com 25
C:>telnet yahoo.com
NOTE: The default port number is 23.When the port number is not specified the default number is assumed.
Telnet Hacking is explained in detail in the following post.
How To Send Fake Email
3. NSLOOKUP
Many times we think about finding out the IP address of a given site.Say for example google.com,yahoo.com,microsoft.com etc.But how to do this? For this there are some websites that can be used to find out the IP address of a given site.But in Windows we have an inbuilt tool to do this job for us.It is nslookup.Yes this tool can be used for resolving a given domain name into it’s IP address (determine the IP of a given site name).Not only this it can also be used for reverse IP lookup.That is if the IP address is given it determines the corresponding domain name for that IP address.
Syntax:
C:>nslookup google.com
4. NETSTAT
The netstat command can be used to display the current TCP/IP network connections.For example the following netstat command displays all connections and their corresponding listening port numbers.
Eg: C:>netstat -a
This command can be used to determine the IP address/Host names of all the applications connected to your computer.If a hacker is connected to your system even the hacker’s IP is displayed.So the netstat command can be used to get an idea of all the active connections to a given system.
How to Send Anonymous Emails

Most of us are very curious to know a method to send anonymous emailsto our friends for fun. But the question is, is it possible to send anonymous emails in spite of the advanced spam filtering technology adopted by email service provides like Gmail, Yahoo etc? The answer is YES, it is still possible to bypass their spam filters and send anonymous emails to your friends. For example, you can send an email to your friend with the following sender details.
The art of sending this kind emails is known as Email Spoofing. In my previous post on How to Send Fake Email I insisted on using your own SMTP server to send anonymous emails. This method used to work successfully in the past, but today it has a very low success rate since Gmail and Yahoo(all major email service providers) blocks the emails that are sent directly from a PC. In this post I have come up with a new way to send anonymous emails (spoofed emails) that has 100% success rate. If you have to successfully send an anonymous email or spoofed email, you should send it using a relay server.
What is a Relay Server?
In simple words, a relay server is an SMTP Server that is trusted by Google or Yahoo as an authorised sender of the email. So, when you send an email using a relay server, the email service providers like Yahoo and Gmail blindly accept the emails and deliver it to the inbox of the recipient. If the SMTP server is not authorised, Google and Yahoo will reject all the emails sent from this SMTP server. This is the reason for which using our own SMTP server to send emails fail.
So What’s Next?
Now all we have to do is, find a trusted SMTP server to Send Spoofed Emails. Usually all the emails that are sent from web hosting providersare trusted and authorised. So, you have to find a free web hosting provider that allows you to send emails. But, most of the free Web Hosts disable the Mail feature and do not allow the users to send emails. This is done just to avoid spamming. However all the paid hosting plans allow you to send any number of emails. Once you find a hosting service that allows to send emails from their servers, it’s just a cakewalk to send anonymous emails. All we have to do is just modify the email headers to insert the spoofedFrom address field into it.
I have created a PHP script that allows you to send emails from any name and email address of your choice. The script can be found here.
Here is a step-by-step procedure to setup your own Anonymous Email Sender Script
3. Login to your FreeWebHostingArea Account and click on File Manager.
4. Upload the sendmail.php, pngimg.php and bg1.PNG files to the server.
5. Set permissions for sendmail.php, pngimg.php and bg1.PNG to 777.
6. Now type the following URL
NOTE: yoursite must be substituted by the name of the subdomain that you have chosen during the registration process.
7. Use the script to send Anonymous Emails. Enjoy!!!
Tell me whether it worked or not. Please pass your comments…